In this episode I will discuss the different practices around the Quality Check in order to do this important check for ALM as efficient and effective as possible.
Previous episodes:
Visual Studio Team System 2010 - Episode 1: A Focus on Testing
Visual Studio Team System 2010 - Episode 2: No Risk No Test
Visual Studio Team System 2010 - Episode 3: The Lifecycle
In the last episode Clemens talked about the support VSTS2010 will give on the collaboration at artifact level. Different roles in the lifecycle work together on artifacts. Each of them adds their knowledge, vision and ideas to the solution from their view point. These artifacts are accessible by every role in every phase of the project, adding value throughout the lifecycle. People are enabled to collaborate, making applications together, and not only by telling what they are doing but most important by working seamless together on the application.
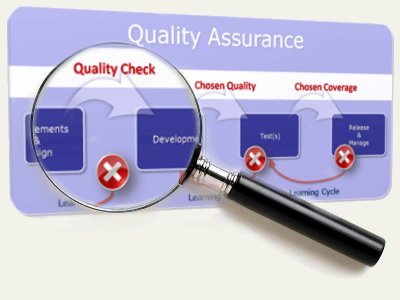
TMap® Quality Check
A subsequent measure for increasing the quality of the developed artifacts is an evaluation activity: for instance the review.
The review on the requirements and/or design can be carried out as a static test activity before the coding starts.
In the review, the following points can be checked, independently of the set requirements:
1. Has the artifact been realized in accordance with the assignment? For example, are the requirements laid down in the technical design realized correctly, completely and demonstrably?
2. Does the artifact meet the following criteria: internally consistent, meeting standards and norms and representing the best possible solution? ‘Best possible solution’ means the ‘best solution’ that could be found within the given preconditions, such as time and finance.
3. Does the artifact contribute to the project and architecture aims? Is the artifact consistent with other, related artifacts (consistency across the board)?
4. Is the artifact suitable for use in the next phase of the development?
Why?
Like testing, the Quality Check is a measure to provide insight into the quality of delivered products and the related risks when taken into the next phase of the lifecycle. If the quality is inadequate timely measures can be taken, such as rework by the designers. However, there is never an unlimited quantity of resources and time. In theory it is important to relate the Quality Check effort to the expected risks. A pragmatic approach to determine the Quality Check effort is to look at some past projects and answer the question:
"How many defects, detected in Acceptance Tests, could have been found much earlier, if we had done a Quality Check? (According to the above points)"
In my experience 10-20% of the defects could have been found much earlier in the lifecycle when the Quality Check was done properly. And because defects in the Acceptance Test are quite expensive, you only have to find 1 or 2 serious defects in the Quality Check to make it economic worthwhile. So my strong recommendation is:

7 Hints and tips
1. Performing a good Quality Check is a kind of inborn specialization. Find a person who is good in recognizing texts with high potential risk on assumptions and or interpretation errors. In other words: find a pencil-pushing, nit-picky quality geek!
 Most professional testers are proud to have these qualifications.
2. Before checking an artifact: What is the quality of its source? Is the source of the AUC (Artifact Under Check) ready? authorized? stable? If not, consider to do also a check on the source of the artifact to quantify the possible changes in the (near) future,
3. If a previous version of the artifact is available, and the quality of that version is known: make use of a so called Comparison Tool to find and check the differences. AND! Check always the consistency of the “change register”, especially when the “change register” is used in the next phase to implement the changes.
4. Combine the Quality Check with the estimation activity for the next phase. If the estimation is done by another person, let them work together!
5. Use a checklist as a reference! For your own protection, a checklist prevents that too much attention is paid to the use of standards and correct spelling or even to these aspects alone (This can be a cause of friction among the various people involved.) Partly owing to the diversity of design techniques and information sources that, it is not possible to create one general checklist per artifact type. Therefore, checklists should be created specific to the situation per organization and per project. Of course you can use examples like Testing Requirements or Testing Use Cases as a start for the creating of your checklist.
6. Make always clear what checks you will perform. By communicating your checklist you can prevent a lot of misunderstandings on later findings.
7. Audi alteram partem (hear the other side). Don't report on findings/defects without a fair hearing in which the author of the artifact is given the opportunity to respond to the "accusations" against his work.
Collaborate
For some, it is very tempting to do a review in their own silo: Get the stuff to check, find as much as defects as possible, receive applause for the prevented damage and do that over and over again……
Wrong! Don’t be a Scrooge! (see my blog: "Does Scrooge exist?") An essential part of the Quality Check is the Learning Cycle. By performing Quality Checks the quality of future AUC’s (Artifacts Under Check) must grow. So collaborate with the designer, information analyst or whoever made that artifact, and get your applause on the better quality of artifacts instead on the number of defects.
In the next episode Clemens will explain how the tools support the Quality Check, as well as the collaboration around it, to get the optimum results.
Previous episodes:
Visual Studio Team System 2010 - Episode 1: A Focus on Testing
Visual Studio Team System 2010 - Episode 2: No Risk No Test
Visual Studio Team System 2010 - Episode 3: The Lifecycle
In the last episode Clemens talked about the support VSTS2010 will give on the collaboration at artifact level. Different roles in the lifecycle work together on artifacts. Each of them adds their knowledge, vision and ideas to the solution from their view point. These artifacts are accessible by every role in every phase of the project, adding value throughout the lifecycle. People are enabled to collaborate, making applications together, and not only by telling what they are doing but most important by working seamless together on the application.

TMap® Quality Check
A subsequent measure for increasing the quality of the developed artifacts is an evaluation activity: for instance the review.
The review is a method of improving the quality of an artifact by evaluating the work against the requirements and/or guidelines and subjecting it to peer review.
The review on the requirements and/or design can be carried out as a static test activity before the coding starts.
In the review, the following points can be checked, independently of the set requirements:
1. Has the artifact been realized in accordance with the assignment? For example, are the requirements laid down in the technical design realized correctly, completely and demonstrably?
2. Does the artifact meet the following criteria: internally consistent, meeting standards and norms and representing the best possible solution? ‘Best possible solution’ means the ‘best solution’ that could be found within the given preconditions, such as time and finance.
3. Does the artifact contribute to the project and architecture aims? Is the artifact consistent with other, related artifacts (consistency across the board)?
4. Is the artifact suitable for use in the next phase of the development?
Why?
Like testing, the Quality Check is a measure to provide insight into the quality of delivered products and the related risks when taken into the next phase of the lifecycle. If the quality is inadequate timely measures can be taken, such as rework by the designers. However, there is never an unlimited quantity of resources and time. In theory it is important to relate the Quality Check effort to the expected risks. A pragmatic approach to determine the Quality Check effort is to look at some past projects and answer the question:
"How many defects, detected in Acceptance Tests, could have been found much earlier, if we had done a Quality Check? (According to the above points)"
In my experience 10-20% of the defects could have been found much earlier in the lifecycle when the Quality Check was done properly. And because defects in the Acceptance Test are quite expensive, you only have to find 1 or 2 serious defects in the Quality Check to make it economic worthwhile. So my strong recommendation is:

7 Hints and tips
1. Performing a good Quality Check is a kind of inborn specialization. Find a person who is good in recognizing texts with high potential risk on assumptions and or interpretation errors. In other words: find a pencil-pushing, nit-picky quality geek!
2. Before checking an artifact: What is the quality of its source? Is the source of the AUC (Artifact Under Check) ready? authorized? stable? If not, consider to do also a check on the source of the artifact to quantify the possible changes in the (near) future,
3. If a previous version of the artifact is available, and the quality of that version is known: make use of a so called Comparison Tool to find and check the differences. AND! Check always the consistency of the “change register”, especially when the “change register” is used in the next phase to implement the changes.
4. Combine the Quality Check with the estimation activity for the next phase. If the estimation is done by another person, let them work together!
5. Use a checklist as a reference! For your own protection, a checklist prevents that too much attention is paid to the use of standards and correct spelling or even to these aspects alone (This can be a cause of friction among the various people involved.) Partly owing to the diversity of design techniques and information sources that, it is not possible to create one general checklist per artifact type. Therefore, checklists should be created specific to the situation per organization and per project. Of course you can use examples like Testing Requirements or Testing Use Cases as a start for the creating of your checklist.
6. Make always clear what checks you will perform. By communicating your checklist you can prevent a lot of misunderstandings on later findings.
7. Audi alteram partem (hear the other side). Don't report on findings/defects without a fair hearing in which the author of the artifact is given the opportunity to respond to the "accusations" against his work.
Collaborate
For some, it is very tempting to do a review in their own silo: Get the stuff to check, find as much as defects as possible, receive applause for the prevented damage and do that over and over again……
Wrong! Don’t be a Scrooge! (see my blog: "Does Scrooge exist?") An essential part of the Quality Check is the Learning Cycle. By performing Quality Checks the quality of future AUC’s (Artifacts Under Check) must grow. So collaborate with the designer, information analyst or whoever made that artifact, and get your applause on the better quality of artifacts instead on the number of defects.
In the next episode Clemens will explain how the tools support the Quality Check, as well as the collaboration around it, to get the optimum results.


 ( 3.1 / 2338 )



 Calendar


